Information about the coronavirus pandemic is constantly evolving as we learn more about its spread and transmission. Initially, the Centers for Disease Control and Prevention (CDC) advised against the use of face masks, but has since revised their guidelines and now recommends wearing cloth face coverings in public, particularly in high-traffic areas such as grocery stores and pharmacies, and in places where there is significant community-wide transmission of the virus. No mask offers 100 percent protection, but cloth masks will help slow the spread of COVID-19 and are essential in helping to “flatten the curve.” The general public should refrain from wearing surgical masks and N-95 respirators, as those are in short supply and should be reserved for healthcare professionals and first responders.
Even while wearing a mask, it’s important to continue to practice social distancing and maintain good hygiene. Keep at least six feet of space between yourself and others, wash your hands frequently, and refrain from touching your face.
In order to be effective and safe, cloth face masks should:
- Fit snugly but comfortably
- Be secured with ties or ear loops
- Allow for unrestricted breathing
- Be able to be cleaned in a washer and dryer without damage
Fortunately, cloth face masks are easy to make at home from materials on hand. Best of all, you don’t even need a sewing machine! The ideal fabric is made of tightly woven 100% cotton; bandanas, handkerchiefs, scarves, t-shirts, and pillowcases are all popular choices. You’ll need something to keep the mask secure, such as rubber bands, hair ties, shoelaces, or string.
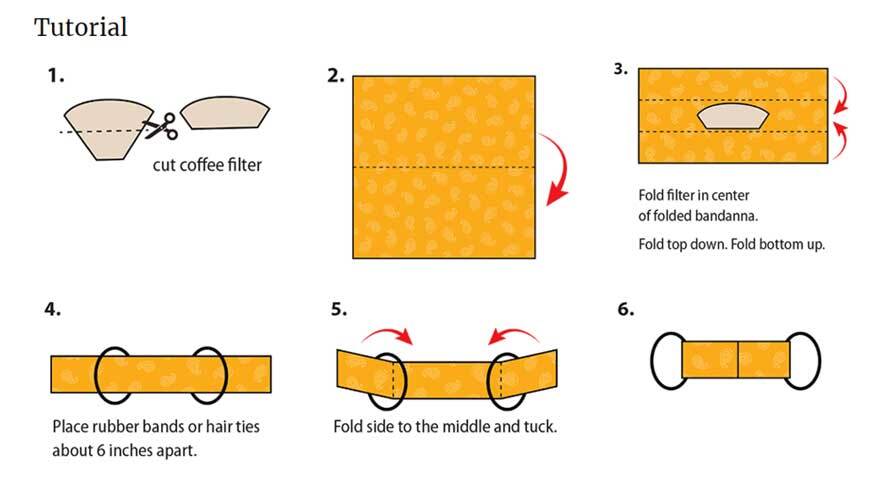
Below are step-by-step instructions for a few simple cloth masks. You should be able to craft these using supplies you already have around the house. For an extra layer of protection, you can insert a paper coffee filter beneath the front of the mask.
Bandana & Hair Ties or Rubber Bands
Probably the easiest no-sew face mask to make involves a bandana (or handkerchief) and hair ties or rubber bands.
- Lay your bandana or handkerchief flat.
- Fold the top and bottom in toward the center, so they meet in the middle.
- Fold the cloth in half again. You’ll now have four layers of fabric.
- Fold the sides in toward the center, so they meet in the middle. Make sure they overlap slightly.
- Tuck one end of the fabric into the other.
- Loop one hair tie or rubber band over each end and slide a few inches toward the middle.
- Place the mask on your face and secure the straps. Loop the hair ties or rubber bands around each ear.
- Ensure that your nose and mouth are completely covered and you can breathe comfortably.


Bandana & Fabric Strips
If you’d rather tie your face mask around your head, you can substitute fabric strips for the hair ties or rubber bands. Shoelaces, string, or cloth from an old t-shirt all work well. Cut them so they are 18″ long. Repeat the above steps, using the fabric strips in the same place as the hair ties. Rather than looping over your ears, simply tie the strips in the back.
T-Shirt & Hair Ties, Rubber Bands, or Fabric Strips
If you’ve got old cotton t-shirt (or better still, a woven dress shirt), it’s easy to repurpose into a face mask. This mask is versatile; you can use rubber bands, hair ties, or fabric strips to secure it. Follow the same pattern as you did for the bandana.
- Cut a square measuring 20″ x 20″ from your shirt. Try cutting from the front or back of the shirt; you’ll want to avoid using any part that contains stitching or hems.
- Fold the top and bottom in toward the center, so they meet in the middle.
- Fold the cloth in half again. You’ll now have four layers of fabric.
- Fold the sides in toward the center, so they meet in the middle. Make sure they overlap slightly.
- Tuck one end of the fabric into the other.
- If using hair ties or rubber bands, loop one over each end and slide a few inches toward the middle. If using fabric strips, lay them in the same place.
- Place the mask on your face and secure the straps. Loop the hair ties or rubber bands around each ear, or tie the fabric strips around the back of your head.
Quick-Cut T-Shirt with Tie Strings
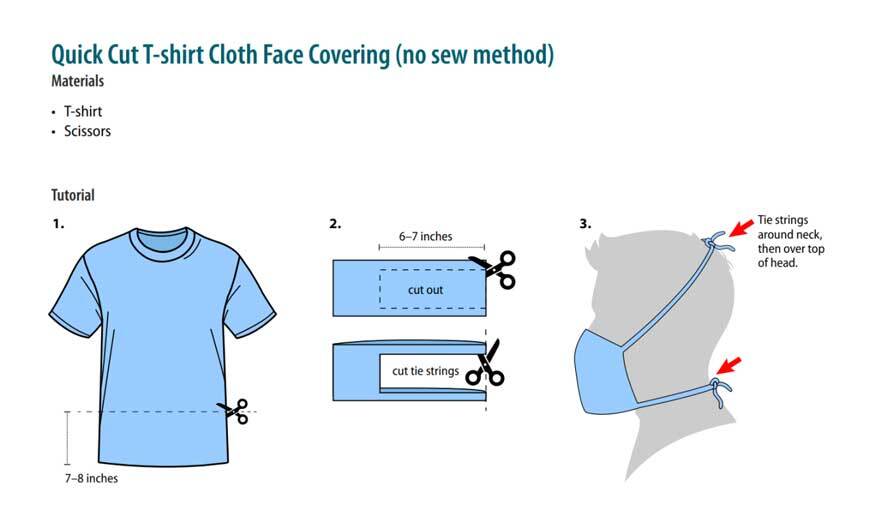
An even easier solution involves a face mask with tie strings cut from the same material as your t-shirt.
- Cut 8″ off the bottom of a t-shirt.
- Lay this rectangular piece flat and cut out a 6″ section from a folded side of the shirt, leaving 1″ strips on the top and bottom.
- Cut the edges of your strips, creating tie strings along the top and bottom.
- Tie the bottom strings around your neck and the top strings over your head.


Caring for Your Mask
To care for your mask, wash it frequently…experts recommend after every use. Don’t forget to remove the rubber bands if you’re using those before throwing your mask into the washing machine!
COMPILED BY MARK PETRUSKA

